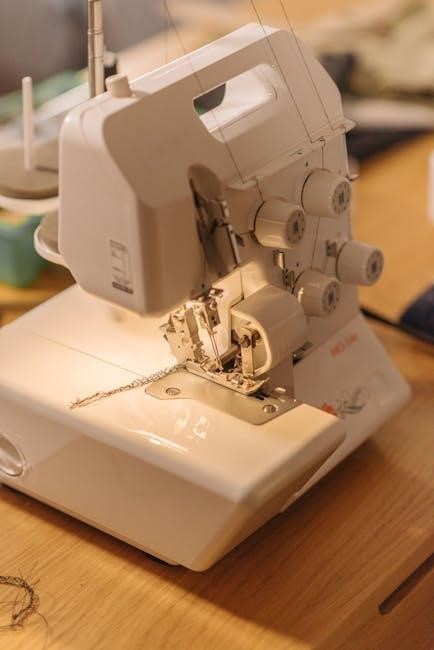
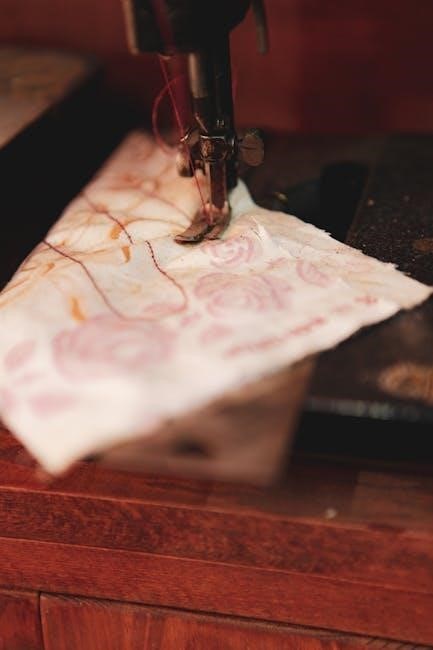
Thread guides are essential components that direct the thread through a sewing machine, ensuring proper tension and alignment for smooth stitching. They prevent tangles and ensure professional results for sewers of all levels.
Importance of Proper Threading
Importance of Proper Threading
Proper threading is crucial for a sewing machine to function smoothly and deliver professional results. Incorrect threading can lead to tangled threads, uneven tension, and poor stitch quality, potentially damaging the machine or fabric. Proper threading ensures the thread flows smoothly through the machine, maintaining consistent tension and preventing breakage. This is essential for achieving straight, even stitches and avoiding common issues like puckering or loose seams. Additionally, correct threading reduces the risk of machine jamming and extends the lifespan of the sewing machine. For both beginners and experienced sewers, proper threading is the foundation of successful sewing projects, ensuring efficiency and reducing downtime due to thread-related problems. It also helps maintain fabric integrity and prevents wasted material.
Overview of Thread Guides
Overview of Thread Guides
Thread guides are essential components of a sewing machine that direct the thread from the spool to the needle, ensuring smooth and efficient stitching. These guides are strategically placed to control the thread’s path, preventing tangling and maintaining proper tension. They include key elements like the spool pin, spool thread guide, tension discs, take-up lever, and needle thread tension post. Each guide plays a specific role in the threading process, ensuring the thread flows seamlessly through the machine. Proper alignment and use of these guides are crucial for achieving consistent stitch quality and avoiding common issues like uneven tension or thread breakage. By following the numbered guide path on the machine, sewers can ensure accurate threading, which is vital for both beginners and experienced users. Thread guides simplify the threading process, making it easier to set up the machine for any sewing project. They are designed to enhance productivity and ensure professional results.
Key Components of a Sewing Machine Thread Guide System
The thread guide system includes the spool pin, tension discs, take-up lever, and needle, each playing a critical role in directing the thread smoothly through the machine.
Spool Pin
The spool pin is a metal or plastic component on the sewing machine that holds the thread spool in place. It can be vertical or horizontal, depending on the machine. For a vertical spool pin, the thread comes off the front of the spool, while a horizontal pin directs the thread toward the back. A spool cap is often placed on top of the spool to secure it and prevent the thread from tangling or snagging. Proper placement of the spool on the pin ensures smooth thread flow. This is the starting point for threading the machine, guiding the thread through subsequent components like tension discs and take-up levers. Ensuring the spool is correctly positioned on the spool pin is crucial for maintaining even thread tension and preventing sewing issues. Regular inspection is recommended to ensure it remains in good condition.
Spool Thread Guide
The spool thread guide is a crucial component that directs the thread from the spool to the tension discs and other parts of the sewing machine. It ensures the thread moves smoothly and maintains proper alignment. After placing the spool on the spool pin, the thread is pulled through the guide slot. Holding the thread with both hands, it is important to move it back and forth to ensure it engages with the tension discs inside the guide. This step is vital for maintaining even tension and preventing tangles. The thread is then drawn around the corner of the guide and firmly pulled along the channel. Proper use of the spool thread guide ensures the thread flows correctly, reducing the risk of issues during sewing. Regular cleaning of this guide is recommended to remove lint and debris, ensuring optimal performance.
Eye Thread Guide
The eye thread guide is a small, looped or slotted component that directs the thread from the take-up lever to the needle. It ensures the thread is properly positioned and aligned before it enters the needle’s eye. After threading the take-up lever, the thread is guided through the eye thread guide, which helps maintain consistent tension and prevents the thread from twisting or looping incorrectly. Proper alignment through this guide is essential for smooth stitching and prevents issues like uneven tension or thread breakage. The eye thread guide is typically located near the needle bar and may vary in design depending on the sewing machine model. Ensuring the thread passes correctly through this guide is a critical step in the threading process, as it directly impacts the quality of the stitches produced. Regular inspection and cleaning of the eye thread guide are recommended to ensure optimal performance and prevent thread jams.
Tension Discs
Tension discs are critical components in a sewing machine’s thread guide system, responsible for regulating the thread’s tension as it passes through. Located near the spool pin or take-up lever, these discs apply consistent pressure on the thread, preventing it from being too loose or too tight. Proper tension ensures smooth stitching and prevents issues like thread tangling or uneven fabric feeding. The discs are typically adjustable, allowing sewers to customize the tension based on the thread type and fabric being used. Incorrect tension can lead to poor stitch quality or thread breakage, making these discs essential for achieving professional results. Regular cleaning and maintenance of the tension discs are recommended to ensure optimal performance and consistent thread flow. Always refer to the machine’s manual for specific adjustment instructions, as improper settings can affect the overall sewing experience.
Take-Up Lever
The take-up lever is a vital part of the thread guide system, responsible for controlling the thread’s movement and tension as it passes through the sewing machine. Located near the tension discs and spool thread guide, the lever moves up and down with each stitch, ensuring the thread feeds smoothly and consistently. Proper use of the take-up lever is essential to maintain even stitch quality and prevent issues like thread bunching or loose stitches. Sewers should ensure the thread is correctly looped around the lever to achieve the right tension. Regular maintenance, such as cleaning, helps keep the lever functioning optimally. Always refer to the sewing machine manual for specific instructions on adjusting the take-up lever, as improper use can lead to threading problems. This component is key to achieving professional-looking stitches and ensuring a seamless sewing experience.
Needle Thread Tension Post
The needle thread tension post is a critical component that regulates the thread’s tension as it approaches the sewing machine’s needle. Typically located near the take-up lever and eye thread guide, this post ensures the thread is properly aligned and taut before it passes through the needle’s eye. Correct threading through the tension post is essential for maintaining even stitch quality and preventing issues like thread breakage or uneven tension. When threading, guide the thread around the post in the direction indicated by the machine’s markings or manual. Proper tension adjustment ensures smooth stitching and prevents fabric puckering or loose threads. Regularly cleaning the tension post and ensuring no debris accumulates helps maintain consistent thread flow. This small but vital part plays a significant role in achieving professional-looking results in sewing projects.
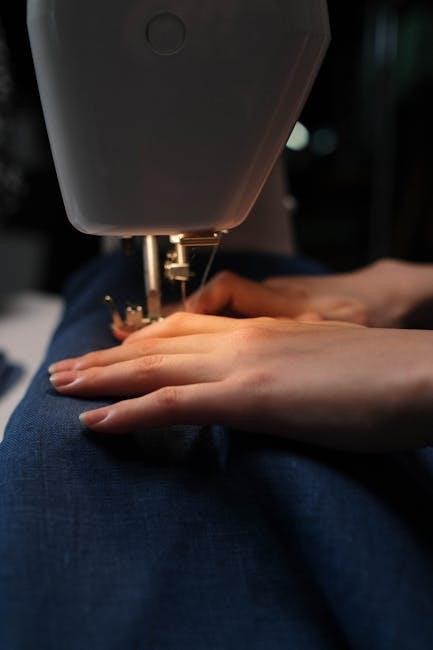
Needle
The needle is the final and most critical point where the thread passes through to create stitches. Its proper threading ensures smooth fabric penetration and consistent stitch formation. Regularly inspect the needle for damage or dullness, as this can cause thread breakage or uneven stitching. The needle’s condition directly impacts the sewing machine’s performance, making it essential to replace it when necessary. Proper alignment and threading through the needle’s eye are crucial for maintaining even tension and preventing tangles. Always use the correct needle type for your fabric to ensure optimal results. The needle’s role in the thread guide system is to deliver the thread precisely, working in harmony with other components like the take-up lever and tension discs to achieve professional-looking stitches.
Step-by-Step Guide to Threading a Sewing Machine
The needle is the final component in the threading process, where the thread passes through its eye to form stitches. Proper threading ensures smooth fabric penetration and consistent stitch formation; Regularly inspect the needle for damage or dullness, as this can cause thread breakage or uneven stitching. Use the correct needle type for your fabric to ensure optimal results. The needle’s condition directly impacts the sewing machine’s performance, making it essential to replace it when necessary. Proper alignment and threading through the needle’s eye are crucial for maintaining even tension and preventing tangles. Always use a high-quality, sharp needle to achieve professional-looking stitches. The needle’s role in the thread guide system is to deliver the thread precisely, ensuring flawless stitching every time.
Placing the Thread Spool
Placing the Thread Spool
Start by correctly positioning the thread spool on the sewing machine’s spool pin. Ensure the spool is securely seated and aligned properly. For vertical spool pins, place the spool with the thread coming off the front. For horizontal pins, position the spool so the thread exits toward the back. Always use a spool cap to hold the spool in place, preventing it from moving or tangling. Gently pull a few inches of thread from the spool to begin the threading process. Make sure the thread feeds smoothly through the machine’s guides. Proper spool placement ensures even thread flow and prevents issues like tangling or uneven tension. This step sets the foundation for accurate threading and consistent stitching. Always refer to your machine’s manual for specific spool placement instructions.
Threading Through the Spool Pin
After placing the thread spool, gently pull a few inches of thread and guide it through the spool pin. Hold the thread with both hands to maintain control. Ensure the thread passes through the guide slot and engages with the tension discs inside. Use a back-and-forth motion to seat the thread properly in the tension discs. This step is crucial for maintaining consistent thread tension. Next, draw the thread around the corner of the guide, pulling firmly along the channel. Continue guiding the thread along the right channel and around the bottom of the thread guide plate. Pull the thread up along the left channel, ensuring it flows smoothly through the machine. Proper threading through the spool pin ensures even thread flow and prevents issues like tangling or uneven stitching.
Guiding the Thread Through the Spool Thread Guide
Guiding the Thread Through the Spool Thread Guide
Once the thread is through the spool pin, carefully guide it through the spool thread guide. Hold the thread with both hands to maintain control and ensure it flows smoothly. Gently pull the thread to engage it with the tension discs inside the guide. Use a back-and-forth motion to seat the thread properly in the discs, ensuring even tension. Next, draw the thread around the corner of the guide, pulling firmly along the channel. Continue directing the thread along the right channel and around the bottom of the thread guide plate. Pull the thread up along the left channel, ensuring it flows smoothly through the machine. Proper alignment and tension at this stage are critical for preventing tangles and ensuring consistent stitching. This step sets the foundation for the rest of the threading process.
Passing the Thread Through the Eye Thread Guide
Passing the Thread Through the Eye Thread Guide
After guiding the thread through the spool thread guide and tension discs, carefully direct it toward the eye thread guide. This guide is typically located near the take-up lever and is essential for maintaining proper thread alignment. Gently pull the thread to ensure it passes smoothly through the eye of the guide. Hold the thread steady with one hand and use the other to guide it through, keeping it taut but not overly tight. Once the thread is through the eye thread guide, it should loop naturally around the take-up lever before moving toward the needle. Proper alignment at this stage ensures even stitching and prevents thread breakage. If your machine has an automatic needle threader, use it to simplify the next step. Otherwise, carefully thread the needle manually, ensuring the thread passes through the needle’s eye from front to back. This step is crucial for achieving consistent stitch quality and avoiding common threading issues.
Adjusting the Thread Tension
Adjusting the Thread Tension
Proper thread tension is critical for consistent stitching. After threading through the guides, gently pull the thread to ensure it engages with the tension discs. Use the tension adjustment dial on your machine to regulate the thread’s tightness. If the thread feels too loose, turn the dial clockwise to increase tension; if it’s too tight, turn counterclockwise. Test the tension by sewing a straight line on scrap fabric. The thread should flow smoothly, without puckering or breaking. Proper tension ensures even stitches and prevents fabric distortion. Regularly check and adjust tension, especially when switching thread types or fabrics. Always refer to your machine’s manual for specific tension settings. Maintaining correct tension is key to achieving professional results and extending the life of your sewing machine.
Threading the Take-Up Lever
Threading the take-up lever is a critical step in ensuring smooth thread flow and even stitching. After guiding the thread through the spool and eye guides, locate the take-up lever, typically positioned near the needle bar. Gently pull the thread to remove any slack, then wrap it around the lever from front to back. Ensure the thread engages securely with the lever’s groove or slot. This step regulates the thread’s release during stitching, preventing uneven tension or fabric puckering. Properly threading the take-up lever ensures consistent stitch formation and reduces the risk of thread breakage. Always refer to your machine’s manual for specific guidance, as lever designs may vary. Once threaded, test the machine by sewing a straight line to confirm smooth thread flow and even tension.
Final Threading of the Needle
Final threading of the needle is the last step in setting up your sewing machine. Once the thread has passed through all the guides and the take-up lever, bring it down toward the needle. If your machine has an automatic needle threader, use it to simplify the process. Otherwise, manually thread the needle by inserting the thread through the needle’s eye from front to back. Hold the thread steady and gently pull it to remove any slack. Ensure the thread is seated properly in the needle’s groove. Once threaded, pull the thread tail to secure it. Test the machine by sewing a few stitches to ensure the needle thread is correctly engaged and functioning smoothly. Proper needle threading is essential for consistent stitching and prevents issues like thread breakage or uneven fabric feeding.
Best Practices for Using Thread Guides
Always use the correct thread type, maintain proper tension, and keep guides clean. Ensure smooth thread flow by following the machine’s guide path and adjusting as needed for optimal sewing performance.
Using the Correct Type of Thread
Using the Correct Type of Thread
Using the correct type of thread is crucial for optimal sewing performance. All-purpose threads, like Gutermann, are ideal for general sewing, while specific fabrics require specialized threads, such as cotton, polyester, or silk. Heavy-duty threads are best for thick materials like denim or canvas. Always match the thread weight and fiber content to your fabric to ensure smooth stitching and prevent breakage. High-quality threads reduce friction and wear on the machine, extending its lifespan. Avoid using low-quality or incompatible threads, as they can cause tangling, uneven tension, or damage to the thread guides. For best results, consult your sewing machine manual for thread recommendations tailored to your machine and projects. Choosing the right thread ensures professional-looking stitches and enhances your overall sewing experience.
Maintaining Proper Thread Tension
Maintaining proper thread tension is vital for consistent stitching and to prevent issues like uneven seams or thread breakage. Begin by following the machine’s built-in thread guides and tension settings. Adjust the tension discs to ensure the thread flows smoothly without being too tight or loose. Test the tension by gently pulling the thread; it should have a slight resistance but not feel rigid. If the thread is too loose, stitches may be sloppy, while overly tight thread can cause breakage or machine damage. Use the take-up lever to fine-tune the tension as needed. Regularly check and adjust the tension, especially when switching thread types or fabrics. Proper tension ensures balanced stitching, reduces wear on the machine, and enhances overall sewing quality. Always refer to your sewing machine manual for specific tension adjustment guidelines.
Regular Cleaning of Thread Guides
Regular cleaning of thread guides is crucial to ensure smooth thread flow and prevent lint buildup, which can cause threading issues. Turn off and unplug your sewing machine for safety. Use a small brush or cotton swab to gently remove lint and debris from the spool pin, spool thread guide, and tension discs. Pay special attention to areas where thread frequently passes, as these are prone to accumulation. For stubborn lint, a can of compressed air can be used to blow out particles. Avoid using liquids, as they may damage the machine’s components. Clean the needle thread tension post and eye thread guide regularly to maintain proper thread alignment. Keeping the thread guides clean ensures consistent stitching, reduces the risk of thread tangling, and prolongs the machine’s lifespan. Make this a routine part of your sewing maintenance for optimal performance.
Troubleshooting Common Thread Guide Issues
Common issues with thread guides include tangling, incorrect tension, or thread not engaging properly. Check each guide for lint buildup or misalignment and ensure the thread follows the correct path precisely.
Thread Tangling
Thread Tangling
Thread tangling is a common issue that can disrupt the sewing process. It often occurs when the thread is not properly guided through the machine’s thread guides, causing it to loop or twist excessively. Improper threading, such as missing a guide or incorrect tension, can lead to tangles. Additionally, lint or debris buildup in the thread guides or tension discs can cause the thread to catch and tangle. To resolve this, carefully remove any tangled thread, clean the guides, and rethread the machine following the manufacturer’s instructions. Using high-quality thread and ensuring proper tension settings can also help prevent tangling. Regular maintenance of the thread guides and tension discs is essential to keep the machine running smoothly and avoid this frustrating issue.
Incorrect Thread Tension
Incorrect Thread Tension
Incorrect thread tension is a frequent issue that can significantly affect the quality of your stitching. If the tension is too tight, it may cause the thread to break or the fabric to pucker. Conversely, if the tension is too loose, stitches may be uneven or gaps can appear. This problem often arises when the thread is not properly guided through the tension discs or when the take-up lever is not correctly positioned. To address this, ensure the thread is seated correctly in the tension discs and adjust the tension knobs according to the machine’s guidelines; Using the correct type of thread for your fabric and regularly cleaning the tension discs can also help maintain proper tension. Always refer to your sewing machine’s manual for specific tension adjustment instructions to achieve balanced stitching.
Thread Not Engaging Properly
Thread not engaging properly is a common issue that can disrupt the sewing process. This occurs when the thread fails to pass correctly through the machine’s components, such as the spool pin, tension discs, or take-up lever. Improper threading, misaligned guides, or overlooked thread paths often cause this problem. To resolve it, ensure the thread is seated correctly in the spool pin and guides. Check that the take-up lever is in its highest position and that the thread is wrapped around it properly. If the thread still doesn’t engage, verify that it is passing through all guides, including the eye thread guide and tension discs. Using high-quality thread and ensuring the machine is clean can also prevent this issue. Always follow the machine’s threading diagram to ensure the thread path is accurate and functional.
Needle Thread Breakage
Needle Thread Breakage
Needle thread breakage is a frustrating issue that can halt your sewing progress. It often occurs due to improper threading, using the wrong needle size, or incorrect thread tension. To prevent this, ensure the needle is suitable for your fabric type and thread weight. Always thread the machine with the presser foot raised, as this disengages the tension discs, allowing smooth thread flow. If the thread breaks frequently, check for sharp or damaged needle eyes, as these can fray or cut the thread. Regularly cleaning the thread guides and tension discs can also prevent breakage. Using high-quality thread and maintaining proper machine maintenance are key to minimizing this issue. If breakage persists, consult your sewing machine manual for specific troubleshooting steps or adjust the needle thread tension post as needed.
Properly threading a sewing machine is crucial for achieving consistent stitches and preventing common issues like thread tangling or breakage. By following the step-by-step guide and understanding the role of thread guides, sewers can ensure smooth operation. Regular maintenance, such as cleaning thread guides and adjusting tension, further enhances performance. Troubleshooting common problems, like incorrect tension or thread misalignment, can save time and frustration. Investing in high-quality threads and needles also contributes to better results. Whether you’re a beginner or an experienced sewer, mastering the art of threading and using thread guides effectively will elevate your sewing projects and ensure professional-quality outcomes every time.
Additional Resources for Further Learning
For those eager to deepen their understanding of thread guides and sewing machine threading, numerous resources are available. Online tutorials and video guides provide visual instructions, making complex steps easier to follow. Sewing blogs and forums offer tips and troubleshooting advice from experienced sewists. Manufacturer websites often include detailed manuals and specific threading instructions for different machine models. Additionally, sewing communities on social media platforms share insights and solutions to common challenges. Books and workshops focused on sewing techniques can also enhance your skills. By exploring these resources, you can refine your threading techniques and maintain your sewing machine for optimal performance.